This is part three of my journey to go smaller underwater. I now have an Olympus OMD-EM1 and a Nauticam housing with two Inon Z240 strobes. This has cut my traveling camera weight in half. I have a second camera body for backup and topside use and that has cut my topside camera and lens weight in half.
The next part of my quest was to cut down the traveling weight of my laptop and two external hard drives that I take to back up my photos. I have been looking at tablets for quite awhile for other reasons than photography but I thought that a tablet might be a good choice for travel. I looked at different sized tablets and decided that I would like a 10” tablet. I like reading magazines but hate reading them on my laptop because I am always scrolling to read the small print. Perhaps they would be easier to read on a tablet that I could turn in a vertical position. My next concern was the ability to back up my photos to external drives while on a trip. Doing some research, I found that I needed a tablet with a USB port (or micro USB which is more the norm) and one that supported OTG (on-the-go). OTG allows tablets to read and write through the USB port. Some tablets don’t have USB ports at all. I also wanted a tablet that allowed additional storage through memory cards. After much research, I settled on a brand new tablet on the market, the Samsung Galaxy Tab S 10.5.
It has a beautiful display with a resolution of 2560 x 1600 pixels. It has a slot for a micro SD card with a maximum capacity of 128gb. I decided to purchase a 64gb card for the slot. It supports OTG (on-the-go) and has a micro USB connection for charging and for the OTG adapter.
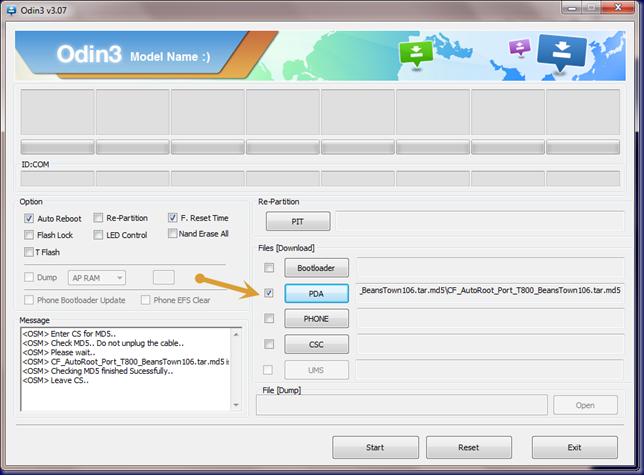
I am going to take a step-by-step of the things that I did to prepare the tablet for travel and photo backup. The first step is to root the tablet (please understand that you may void the warranty by doing this). It is possible to copy photos from your camera’s flash card to jump drives of USB hard drives without rooting. I will describe that process below. I have rooted all the smart phones that I have and have rooted my tablet. The reason that I rooted the tablet is to expand the useable storage space on the device. The tablet has internal storage space of 16gb (gigabytes) with some used for the system and apps. I wanted some of my apps to write to the micro SD card and not to the tablet’s internal storage. Rooting is not a complicated process. Here is guide on how to do it: Galaxy Tab S Root Guide. There is one part of the instruction that might be confusing and I want to clear it up here. In Step #6 of the guide, it says to click on the “AP” button in Odin. Here is screen shot of the correct button to click on:
The correct button is the “PDA” button. All the other directions are correct.
Rooting the tablet gives programs access to the root directories on the tablet and allow them to do what they need to do in those directories. It also allows programs to write to the external SD card (if you install one in your tablet).
Update: Please read the whole blog post as I changed directions after running into some problems.
You are going to need to buy some cables to make all this work. I purchased “OTG (on-the-go) cables from monoprice.com. I purchased three micro USB to USB female OTG cables for $1.47 each. While I was there, I also purchased a card reader/USB hub for $7.23. I thought that I could plug in the OTG adapter into the tablet and then plug my camera cards and USB sticks or USB hard drives into the USB hub and transfer files from the card to the USB stick or drive. I eventually ended up purchasing one more cable and this is going to be necessary for using USB hard drives for backups. I will get to that a little later.
Now that the tablet is rooted and cables have been purchased, it is time to look at software. My first problem was that I could not get programs to write to my 64gb external SD card. I found a program on the Google Apps store that fixed it. It is SDFix. After installing the program and running it, I was able to write to my external SD card. I also was able to get some of my programs (like Titanium Backup Pro) to store its backups on the external card.
The next software was called StickMount. This program automatically mounts and dismounts USB drives because some phones and tablets don’t do this automatically. The link is to the free version. There is also a pro version that costs a few dollars. After the installation, I connected an OTG cable and connected the card reader/USB hub to the tablet and when I put the card in from my camera, it recognized the card and I could see the files that were on it. The files were raw files from my camera and I could not see the actual photo. This brings me to my next software purchase. Photo Mate R2 costs $9.49 and it allows you to view and edit raw files. I don’t intend to do any editing but I want to review my photos each day to see how I did.
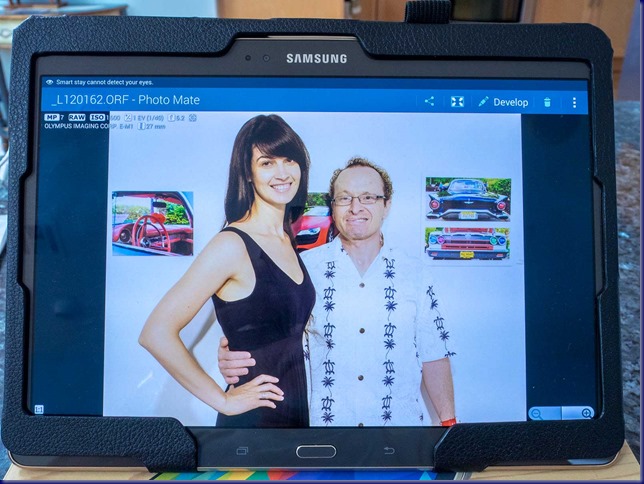
Here is a raw photo in Photo Mate R2 on my tablet. It also happens to be a photo of two of my favorite people in the world, my son Tom and his lovely and beautiful wife, Lynda. So far so good. I can see raw files and move them onto my computer.
The tablet comes with a file manager and it works okay but I wanted one that did more so I chose ES File Explorer File Manager. It is a great file manager and the more that I use it, the more I like it.
 Getting a USB hard drive to connect to the tablet was really tough. I have three different USB hard drives and I could not get any to connect. They were all formatted with NTFS and I tried everything that I could find to get the drives recognized but nothing worked.
One of my first problems was that the tablet did not have enough power out of the micro USB port to power the drives. I needed a drive with dual USB cables so that one cable was plugged into an electrical outlet and the other was connected to the USB hub and then to the tablet.
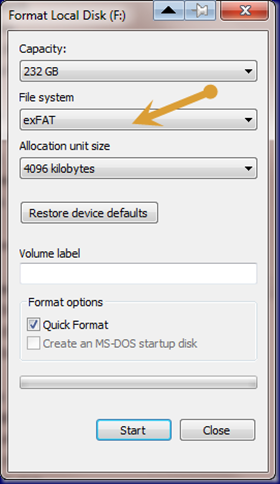
Even with that setup, the tablet would recognize that there was a drive there but could not mount it. I fixed the problem by reformatting the USB hard drive to exFat.
After formatting to exFat, I loaded a raw file onto the drive and connected to the tablet and bam-it was recognized. Unfortunately, it took a number of days to make this happen and I had already formulated another plan that was sure to work. I found that USB jump drives were recognized immediately. Their normal format is exFat. I started looking at higher capacity jump drives and I found PNY 128gb turbo USB 3.0 jump drives for $47.99 cents each. I calculated that I could fit 8738 raw files on each drive.
Our next trip is to Isla de Mujeres to swim with whale sharks. Ronnie and I will be in the water for four days and I don’t anticipate that I will shoot that many photos although I will give it a good try.
My card reader/USB hub has three USB ports and can read five different types of cards. My plan is to attach the OTG cable to the tablet, plug in the card reader/USB hub, plug in two 128gb jump drives and plug in my camera’s flash card. I can then select all the photos from my camera card and copy them to both jump drives. This gives me two backups of all my photos.
Since I can be pretty paranoid about losing photos, I will also bring one USB hard drive and make a third copy. To use the USB hard drive I bought a male to female USB cable so that I could connect one of the two USB cables from my USB hard drive to an electrical outlet. MY USB hard drive enclosure has a micro USB plug on one that goes to the enclosure and two male USB ends. When used with my laptop, I plug both USB ends into the laptop. One is used for data transfer and the other is used to power the hard drive.
The issue when using this setup with the tablet is that the Power connector is too short to connect to a USB electrical adapter. The USB male to female cable is three feet long, cost $1.02 and will take care of that problem.
After all my work, I ran into problems. The problems came from having the USB card reader/hub unpowered. It was getting its power from the tablet and if I put in one camera flash card and two USB jump drives, I could get everything to connect at one time. This led me to purchase yet another cable.
This cable cost $6.95 with free shipping from California. Here is the link. Once I received the cable, I plugged the micro USB end into the tablet and connected a USB charger to the female micro USB connecter and connected the USB card reader/hub to the female USB end. This seemed to be the ideal setup. I tried two USB jump drives and my camera’s flash card a number of times and things seemed to go well but I had some trouble with StickMount. I would plug in one of the flash drives and it would become corrupted and I had to reformat it. This was a real problem. I decided to do some more research and see if I could find a better and more reliable solution. The answer was a $3.99 program named Nexus Media Importer. I installed it on the tablet, plugged in my USB card reader/hub and it recognized all my drives. It also allowed me to see thumbnails of the raw files on my flash cards. It was pretty easy to navigate and I was thrilled. I uninstalled StickMount. One of the great things about Nexus Media Importer is that you don’t have to be rooted to use it. With the powered hub, I was able to use my camera’s flash card and three USB jump drives at the same time.
After my 128gb jump drives arrived, I ran into another glitch. These large drives are formatted exFat and Nexus Media Importer does not read exFat drives. Normally, jump drives of 32gb or less are formatted in Fat32 which will work fine. There is no real downside to formatting the drives in Fat32. I found a free program online that allowed me to format the 128gb drives in Fat32 and I was back in business. The program is Fat 32 Formatter. The download link is at the end of the first sentence. My final setup that I am taking on the trip includes two USB card reader/hubs with two Micro USB Male To Micro USB Female Host OTG Cable – Micro USB Adapter Y Splitter’s, two USB chargers, two micro USB to female USB OTG cables (probably won’t need them), two 128gb jump drives and two 32gb jump drives. I have decided not to take my USB hard drive. I guess that I am really being adventurous here.
Here are two photos showing the entire setup at work:
In this photo, the camera flash card contents are in the left hand side of the screen and the directory for the 128gb jump drive are on the right. I use a drop down on the left side to select all photos and then select copy and they will all be copied to the jump drive. After the copy is complete, I navigate to the second jump drive and do the same thing, ending up with two copies of all my photos.
I will know soon how it all works as it almost time to fly to Mexico and spend four glorious days with whale sharks. I will post the results of the trip when I return.
© 2014 – 2024, Herb Segars. All rights reserved.


I thought an ipad could suffice but it can’t do video. I’ve slimmed down with a 13″ mac book air, with 500GB drive. It’s not much bigger than the ipad.
That is a good choice, John. I am not a big Apple fan so the tablet that I chose was the best choice for me. Traveling and underwater photography is getting to be a game of money and anyway that I can save costs so that I can travel more is a good thing.
Thank you for this Herb; it’s exactly what I needed! Quick question: why didn’t you just plug the hard drive into the third USB port in the hub instead of having a separate set-up?
Best,
Andrea