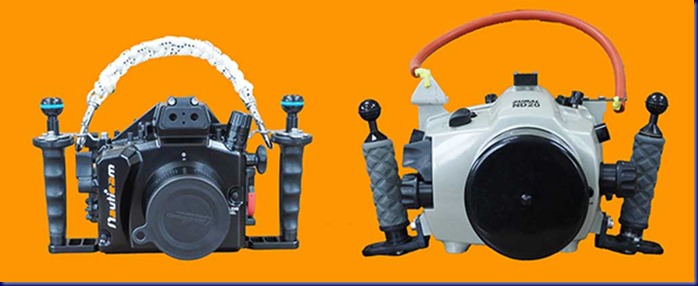
In part one of “Going Smaller Underwater”, I talked about my journey to downsize on my underwater photography gear. This blog is going to be about the difference in my existing Subal housing and my new Nauticam housing. My Subal housing is actually for the Nikon D200 but I was able to purchase a kit to adapt the Nikon D300 to the housing without the expense of a new housing. It has served me well for a number of years. I am very familiar with its controls and I love the 180 degree viewfinder that gives me a great view of my photo area.
The Nauticam housing on the left is for my new Olympus OMD-EM1 camera. Looking at the two housings side-by-side, there seems to be a big difference between the two. In reality the measurements in width and height are not too different but the front-to-back measurement is.
|
Nauticam |
Weight w/o Camera or Lens |
Weight with Camera & Small Zoom Lens |
Height |
Length-Side-to-Side (w/handles) |
Width-Front-to-Back (with viewfinder) |
| Subal | 8.5 pounds | 11.5 pounds | 7” | 13.25” | 7.5” |
| Nauticam | 5 pounds | 6.75 pounds | 6.5” | 12” | 4.5” (only at left end). Remainder 3.5” |
The information shown above is without the camera in the housing and with ports for similar lenses on each housing. Since the Olympus camera is 1.25 pounds less than the Nikon, the total weight savings so far is 4.75 pounds. The weight savings will really increase once I compare the Ikelite DS-125’s and the Inon Z-240’s.
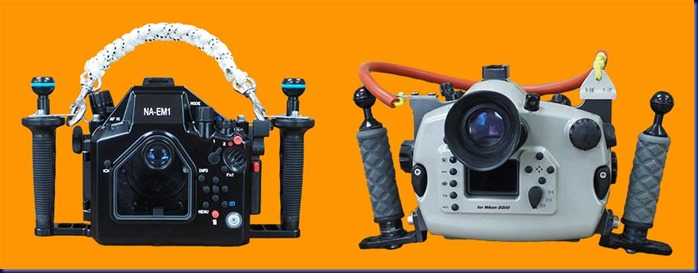
Here is a view of the back of the two housings.
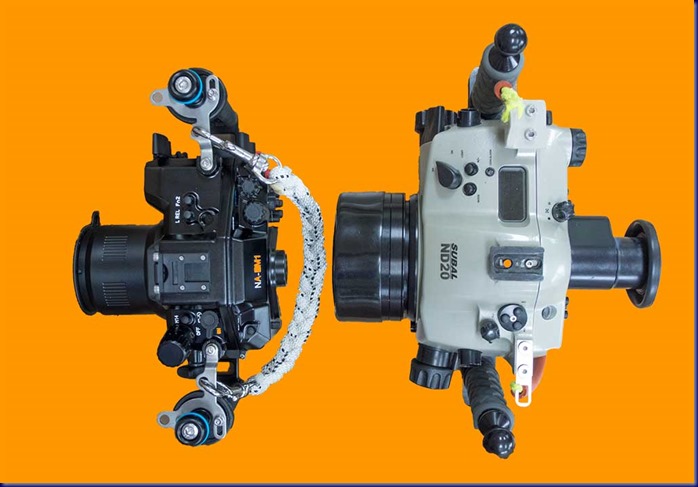
The view from the top shows the dramatic difference between the Nauticam and the Subal housing.
I have had a chance to look over the Nauticam housing and I am very impressed with the build quality. I am also impressed with a lot of other aspects of the housing and the Olympus camera. I think that the housing is priced competitively ($1850.00 USD) and if you have ports from other systems, you may be able to use them with the Nauticam with an adapter. I bought the adaptor so that I could use my Zen 100mm port with the Nauticam housing and the Panasonic 8mm lens. The port adaptor was $240.00 USD but I can now use my Zen 100mm port which cost significantly more than the adaptor. The port shown on the Nauticam housing is the 65mm macro port. I bought it to house the Olympus 12-50mm lens. Nauticam has a port designed for that lens that allows the lens to be switched into a macro mode at 43mm. The port costs over $800 USD and after giving it a lot of consideration, I decided that it would not fit the type of photography that I do. If I want to go into macro mode with a zoom lens, I want the ability to use it across a wider range. My final decision was to buy a zoom gear from Austria. The gear was $142.00 and what I though was crazy about it was that it was printed on a 3D printer. Time will tell how it holds up. Additionally, I can use the macro 65 port for the Olympus 60mm macro lens which is supposed to be superb.
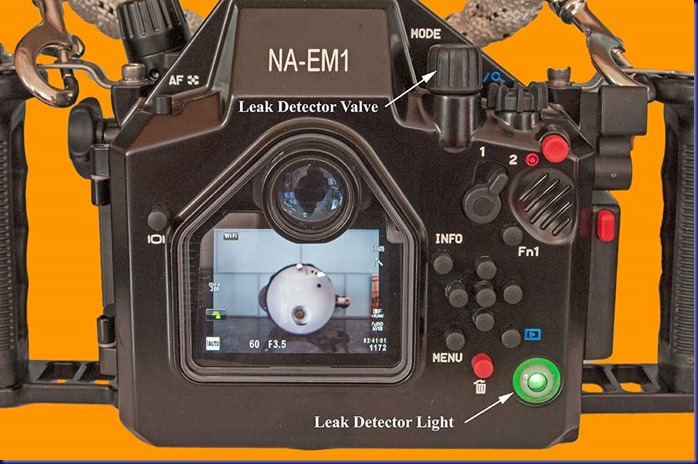
I think one of the most impressive features on the Nauticam housing is the leak detector. The housing comes with the electronic for the leak detector built in. For an additional $240 USD, I purchased the valve for the system along with the vacuum pump. I installed the valve in about five minutes and tried it out. To use it, open the housing and turn on the leak detector switch (bottom of housing) and close the housing. Unscrew the cap on the valve and rotate the spoked mechanism to close the valve (turn clockwise). Attach the pump to the valve and pump it until the leak detection light on the back of the housing turns green.
Once it is green, let the housing sit for 20 minutes to ensure that there are no leaks. I think that is a great addition to the housing. If you do not buy the valve, the leak detector light works if any water enters the housing. The light turns flashing red and an audible alarm sounds.
I do have a few issues with the leak detection system but they are things that I am going to have to work out. First, I usually get my camera and strobes ready a few days before diving at home. I seal everything up and pack it in my camera bag. I can’t do that now since I would need to leave the leak detector turned on for a few days. I can still get ready the same way that I used to but when I get to the boat, I will have to open the housing (which as it turns out is the easiest opening housing that I have every owned), turn on the leak detector switch, close the housing and use the pump until the green light comes on. By the time we get to the dive site, I should be assured that there are no leaks. My other issue comes when releasing the vacuum after a dive. Once the vacuum is released, the leak detector light flashes red and the only way to stop it is to open the housing (did I say how easy it is to open) and shut off the leak detector switch. I think that I will buy a couple spare batteries for the leak detector just to be safe as I don’t know what the life of the battery is.
A feature that I really like on the Olympus camera is the ability to use the LCD screen to take photos. It is a live view with no lag. You can use the info button to change the information shown on the LCD screen. Since I don’t have an enlarged viewfinder for the Nauticam like I do on my Subal, I am going to have to try the housing to see if I need one as it is reasonably expensive option-$1150 USD for the 180 viewfinder and another $240 USD for the rear window to accommodate the viewfinder. Both are user installable and can be installed in a very short period of time.
Opening the Nauticam housing is a piece of cake. There is a little red button on the right side of the back of the housing (see above). Push the button and rotate the latch until the latching mechanism slides out of a slot in the latch. The housing is hinged so it opens easily. It sure beats the twin latches on my Subal.
I am not going to go in depth about all the housing controls, etc. as I have a lot to learn with a new system. I do like the fact that I can call up a menu of options on the LCD screen and I can easily read the options which is a good thing for my old eyes.
One thing that I am going to enjoy with the new housing/camera/strobe combination is using TTL again for macro and close-up photography. I really like TTL and would love to use it underwater. I haven’t had it available for a very long time. I did try the Ikelite converter for my Nikon D300 in the Subal housing but I have to say that it never worked really well. My understanding is that the Inon Z-240’s work well in TTL for macro and close-up subjects so I am anxious to give it a try here in New Jersey this summer. I am also excited about using optical cables between the housing and strobe. I have always thought that they were a great idea but my housings and strobes were never set up to use optical cables.
Part 3 of “Going Smaller Underwater” will be comparing the Ikelite DS-125’s and Inon Z-240’s.
© 2014, Herb Segars. All rights reserved.


Thank you for this information on the Olympus camera which is a Mirrorless Micro Four Thirds Digital Camera. This sure helps in savings for luggage overweight charges in international travel.
Are any of the similar Nikon Four Thirds Digital Cameras worthwhile for underwater photography?
Rolando:
I have not looked at the Nikon cameras. I have been following the Olympus OMD since the OMD-EM5 came out. I really liked what I saw. Before I made the move, the OMD-EM1 came out and I felt that it was the right camera for me.