When Veronica and I were doing our addition, I researched the heck out finding a large screen LCD TV. I have always been a fan of Sony and found that, at the time, the KDL-52XBR4 was getting rave reviews for picture quality. I searched around for the best price and I pulled the trigger. The reviews were correct, the picture quality is incredible. I wish that all was well two years and a few months later (out of warranty, of course).
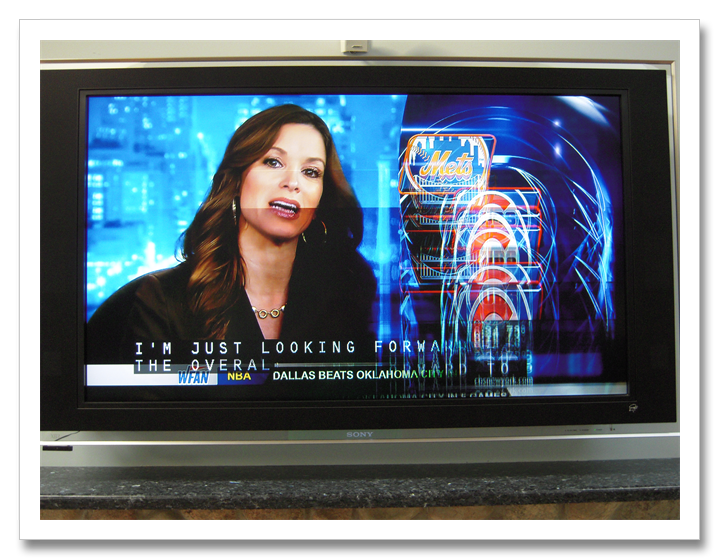
Over the last few weeks, a really strange thing started happening. When I turned on the TV, I saw a double image and horizontal lines on the screen.
After five or ten minutes, the picture would go back to normal so I didn’t pay much attention. Well, it got worse. The only way to get rid of it was to grab one bottom corner of the TV and pull it out (flexing it) and putting a spacer behind the TV to hold it out. I had to move the spacer to different spots before I could get it to work. I googled the problem and found out that I was not alone. Apparently, it is a problem with the 52” and 46” Sony XBR4’s and probably other models. The fix was not so easy to find. There were many thoughts and they seemed to zero in on two possibilities: the UB1 board (also known as the t-con board) and the FB1 board. Before I go further, I would like to say that Sony has been totally unresponsive to the problem with the larger TV’s. They have issued a warranty extension for the 46” XBR4 until 2012. That’s great if you have the 46” model but not great for me.
I contacted Sony and received an e-mail that said:
“Thank you for contacting SonyListens. I am very sorry to hear about your TV.
Some helpful information including troubleshooting tips, bulletins, even repair setup if needed for your model may be found at https://esupport.sony.com/US/perl/model-home.pl?mdl=KDL52XBR4&LOC=3 . If this information is not useful or you need further assistance, please contact Sony’s customer support @ 1-800-222-7669.”
Every person that I saw on the forums that were out of warranty basically got the bum’s rush. It sure is making me rethink my feelings about Sony. Those that were able to get a response from Sony usually got one that said that they would need to have a technician come to the house (at a charge) and diagnose the problem. Sony considers the UB1 and the FB1 as an integral part of the LCD panel and will not replace them (or sell them) separately. When the technicians came and assessed the problem, the clients were told that they needed new panels to the tune of $2000 or more.
I am reasonably competent when it comes to working on equipment so I thought that I would try to replace the board myself. First, make sure that you purchase the correct board. This page on the AVS forum has information on the correct part numbers based on the TV serial number. I decided to replace the UB1 (T-Con) board first as it was the least expensive. I purchased it from ShopJimmy.com. The price for the board was $69.99 plus shipping. I found a 5% off coupon on the web and it was on it’s way.
I was pretty nervous about doing this so I looked and looked for tutorials to do this. I found one but there are some real gray areas during the process. I decided to make my own tutorial so that others might find it easier than I did. Do not fear, it wasn’t nearly as hard as I thought (especially now that I have done it once).
Before I start, I want to state, “IF YOU ARE NOT COMFORTABLE DOING THIS KIND OF WORK, HIRE A PROFESSIONAL.” I did the work and I didn’t have many problems but this is a piece of electrical equipment and you can get hurt. My tutorial in no way encourages anyone to do this replacement. DO IT AT YOUR OWN RISK!!!!
Remove the TV from the wall or stand and place it screen side down on a surface that won’t scratch the screen. I used our bed. There are screws (19) around the outer perimeter of the back side of the screen. Remove them all but remember this – some of the holes have two screws in them. One is larger than the other. Only remove the larger screws. There is no reason to remove the smaller ones. There are also two screws on the panels that cover the inputs and two additional screws that are the same size as those around the perimeter. Make sure that you take those out. Be gentle pulling the back off and you know when you have missed a screw. Just go slow. One thing that I ran into cost me some time and that was my wall mount bracket that was secured to the TV with security screws. They take a special star tool with a hole in the center. I couldn’t find mine and had to buy one so that I could remove the bracket.
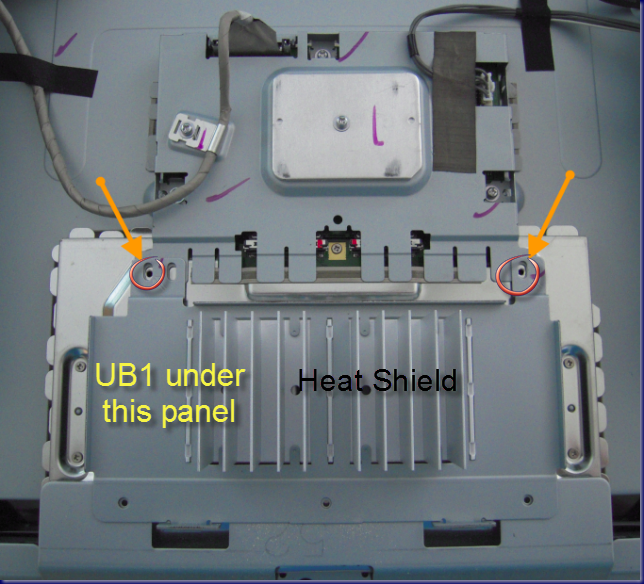
Now that the back is off, you should take off the heat shield from the UB1. It is at the top of the TV in the middle. There are two screws to remove (red circles) and the heat shield will hinge up and off. There will be a spacer that for me came off attached to the bottom of the heat shield. If it doesn’t become detached, leave it where it is. If it does, you will have to place it on the top of the UB1 board cover before replacing the heat shield.
The UB1 is located under the panel that has the square black plate in the middle where the heat shield was but it can’t be removed just yet. Here is where I had trouble. I needed to remove the silver plate (UB1 secondary cover) below the heat shield and I couldn’t figure out how to do it.
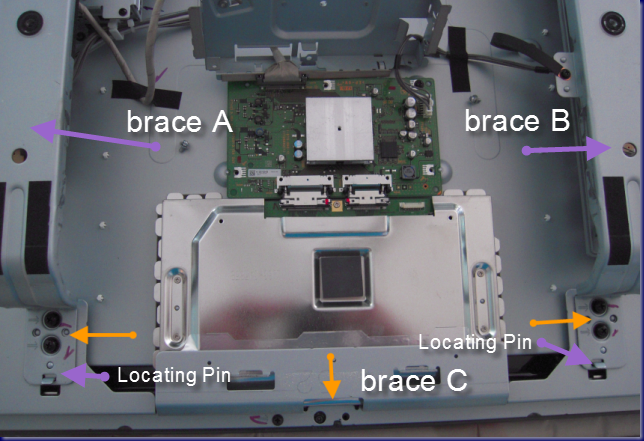
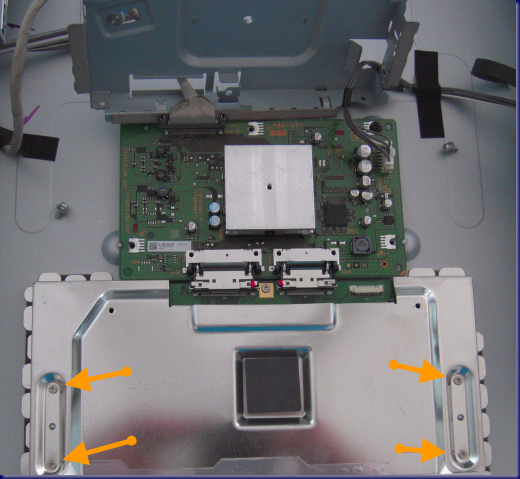
To remove the metal plate under the heat shield, you have to remove two screws from the cross brace on the left (brace A-yellow arrow), the two from the cross brace on the right (brace B-yellow arrow) and one center screw on the vertical part of the brace (yellow arrow). Once down, lift each of the vertical braces and slide the locating pin out of the brace and pull off brace C.
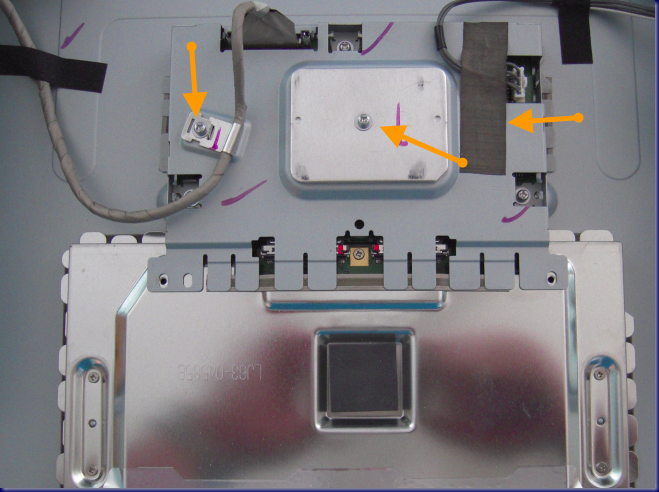
Once the brace is removed, remove the screw from the center of the cover plate (square silver plate in the middle-yellow arrow), remove the screw holding the left hand connector and peel back the tape over the wire to the other connector on the right. There is no reason to remove the connectors.
Hinge the plate up so that it hinges towards the bottom of the TV. Use care to keep the connectors from kinking and leave the cover hinged back. It is now to remove the four small screws from the plate over the UB1.
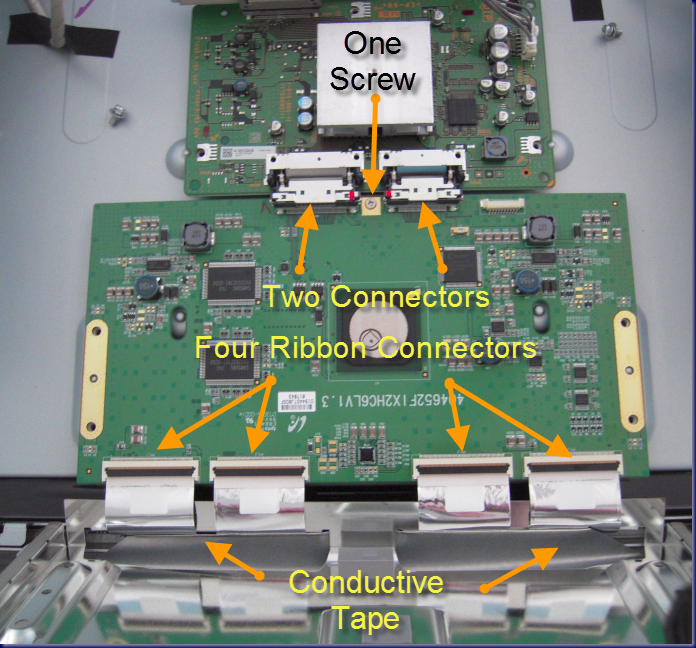
They are very small Phillips head screws so you will need a small screwdriver for this. Now you can see the reason to remove the panel above the UB1. There are two connectors to the other board. They will have be be disconnected later. After the four screws are removed, gently hinge the panel up and towards the front of the TV. It is connected to the frame by a conductive tape but there is no reason to remove it. Just be careful!
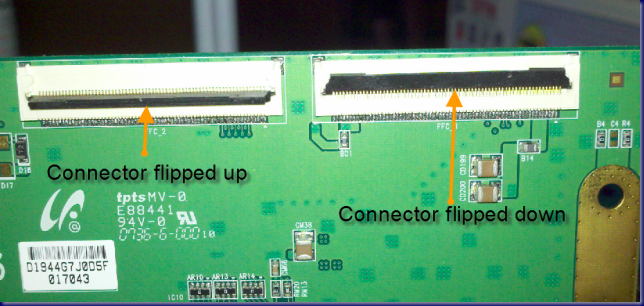
The four ribbon connectors were another problem area for me. I just couldn’t figure them out. When I realized how to do it, I had to smack myself in the head because it is pretty easy. On the top of the ribbon, there is a black strip. It latches up towards the bottom of the TV like a seat belt buckle.
This photo shows the connector on the left flipped up and the one on the right flipped down. You are looking at them upside down from the photo above this one. It was the easiest angle to get the shot. There are also two connectors on the other side of the UB1 that have to be pinched together from the outside of each connector and lifted up. There are two small screws on each side of the connector. Squeeze them together and lift up. Remove the one screw that holds the UB1 and remove the panel. Put the new panel in place and reverse the process.
I would like to warn you one more time, “IF YOU ARE NOT COMFORTABLE DOING THIS KIND OF WORK, HIRE A PROFESSIONAL.” I did it and I didn’t have many problems but this is a piece of electrical equipment and you can get hurt. My tutorial in no way encourages anyone to do this replacement. DO IT AT YOUR OWN RISK!!!!
Now for the bottom line – DID IT WORK??? NO NO NO AND NO.
I will now order the FB1 board which costs $189.00 and change that. My neighbor is sure that it is a problem solder joint on one of the boards. He believes that because the problem goes away once the TV heats up and it is flexed. He offered to come over and help me trouble shoot. I may do that and I will keep you up to speed on my progress.
Well, if it didn’t work, why did I post this? I wanted this to be easier for anyone that undertakes the replacement than it was for me. I am also not afraid to talk about things that don’t work out as I am about the ones that do.
© 2011, Herb Segars. All rights reserved.


The problem is there
Fix for the Tab Bond problem can be found here
https://www.avsforum.com/avs-vb/showthread.php?t=1173106
Herb, while I’m sorry the replacement didn’t work for you, I am hopeful that is the issue with mine. Repair technician could not get a board from Sony or his other source, found one on eBay, but isn’t per their policy allowed to use. So, I suppose we are in a new age where we really don’t have repair services, just diagnostic services, and we’re left to pick up the pieces. Your instructions were flawless (yes, there are 19 screws and I still missed one!!!) Thanks much for taking the time to document, it helped me save considerable time. I’ll come back and post result if the board purchase/install solves my issue. Thanks again.
I’m really impressed with your writing skills as well as with the layout on your blog. Is this a paid theme or did you modify it yourself? Anyway keep up the excellent quality writing, it’s rare to see a nice blog like this one nowadays.
my website: [url=https://www.wernerseck-doggen.de/guestbook/guestbook.php]Webseite[/url]
The part that actually needs to be replaced is not the UB1 board, but the TCON board which is not listed in the service manual but is listed as a part of the LCD panel. The TCON controls the LCD panel. It is the other board you removed in your instructions but didn’t replace.