I purchased Adobe Photoshop CS4 before it was released and received an e-mail that the program was available for download this past week. I was excited to try it as I have recently updated my computer to Vista 64. Photoshop CS4 comes with a 64-bit version that is supposed to take advantage of computer RAM (I have 8 gb in my desktop) and also takes advantage of certain video cards (I also have one of those). The first thing that I found was that none of my plug-ins worked in the 64-bit version of Photoshop CS4. That was disappointing so if your plug-ins are things that you use a lot, you may want to choose the default setup of Photoshop and allow it to load both the 64-bit version (assuming that you have a 64-bit Vista system) and the 32-bit version. It gives you the option to only load the 64-bit version by unchecking the 32-bit version box at the beginning of the installation. I understand that some plug-ins still have issues with the 32-bit version so again, if you need those plug-ins, you might want to keep Photoshop CS3 on your computer until the plug-ins are updated.
Today, I am going to visit one of the new tools in Adobe Camera Raw 5 that really impressed me. Before I start I want to make a point about Adobe Camera Raw (ACR). You can open up jpegs and tiff files in ACR, not just raw files. To see the advantage of opening tiffs and jpegs in ACR, see this page in my Digital Photography section on my web site.
My dive buddy, Beth Dalzell, of Brick, NJ took a photo of me with her point-and-shoot camera in an Ikelite housing. I really like the photo but the floatation arms that I use and my housing were overexposed. To open the jpeg in ACR, right click on the photo in Adobe Bridge and choose “Open in Camera Rawâ€.
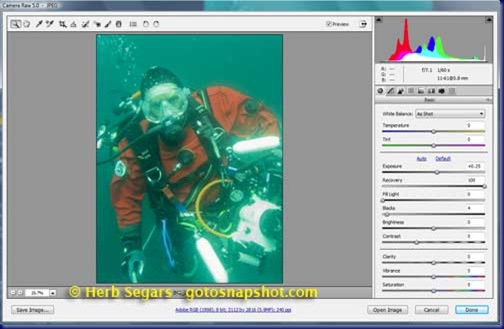
I wanted to reduce the exposure on the two floatation arms and on the housing itself. To do this, I used the the adjustment brush. You can open the brush by clicking on it. It is the fifth tool from the left. You can also choose it by using the “k†key.
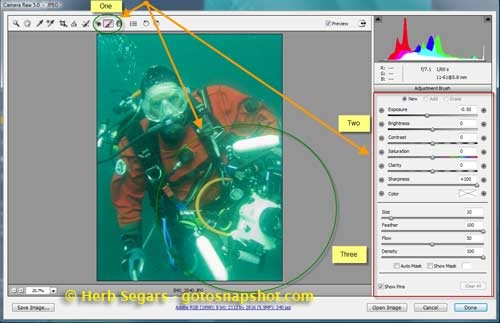
Once the brush is selected, the adjustment brush box opens on the right side of the panel. There are sliders for exposure, brightness, contrast, saturation, clarity, sharpness and color. There are also sliders to adjust the brush settings. I choose to reduce the exposure by 1 f-stop so I slid the exposure slider to the left to –1.00.
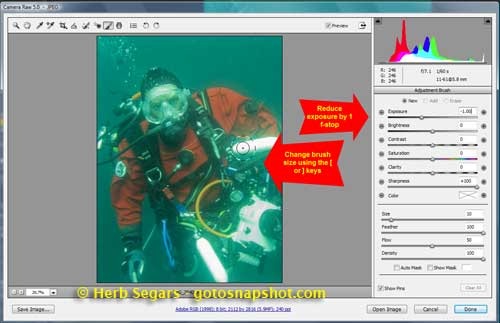
I changed the size of the brush by using the “[ or ]†keys. The left “[“ makes the brush smaller and the right “]†makes the brush larger. I brushed over both white floatation arms and then over the housing itself.
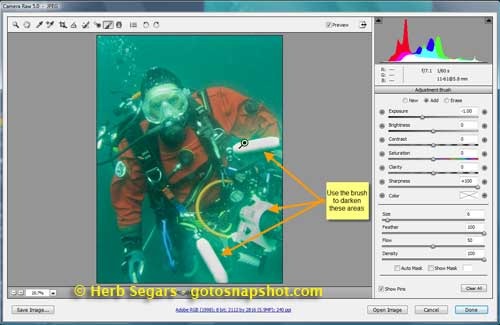
You can see the the exposure was reduced only on the areas that I brushed and I accomplished what I wanted to do.
Here is a look at the photo before I lowered the exposure on the floats and the housing:
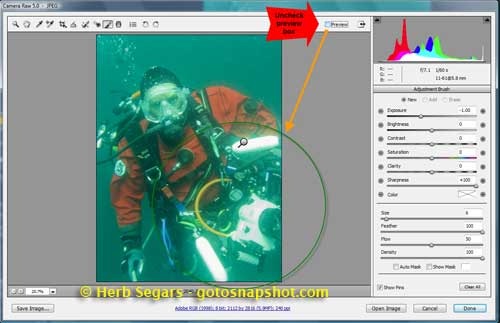
I was able to see before and after by unchecking the “Preview†box to see the before view.
And I rechecked the “Preview†box to see the what it looked like when I was done.
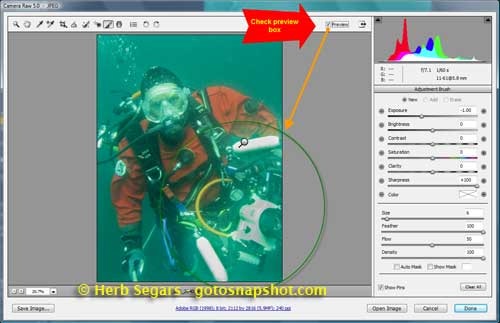
The great thing about using Adobe Camera Raw is that when I was finished, I clicked on the “Done†box and my jpeg was saved with the settings that I applied. These settings are reversible. When I was writing this, I forgot to capture one of the views with the arms and housing were too bright. I reset all the settings in ACR by clicking the “Clear All†button at the bottom of the Adjustment brush box and everything was back to the way it was when I started. Pretty cool.
There are also some other new settings in ACR 5 like a graduated filter tool that I will visit at another time.
One last note about the 64-bit version of Adobe Photoshop CS4. It sure seems to run much faster than CS3 did. I have not processed a lot of photos on it yet but I think that it will really speed up my work flow.
© 2008, Herb Segars. All rights reserved.

